How Do I Carve My Ham?
Carving a ham can be a daunting task, especially if you’re new to the art of carving. It requires a bit of skill and patience, but with practice, you can learn how to carve a delicious ham that will impress your friends and family. With the right tools and a few simple techniques, you can easily master carving a ham. This guide will provide you with all the steps and tips you need to carve a beautiful and delicious ham.
Selecting the Right Type of Ham
When it comes to carving ham, the type of ham you choose is essential. You need to pick the right cut of meat to ensure optimal flavor and texture. The most popular types of ham used for carving are: bone-in hams, boneless hams, and spiral-sliced hams.
Bone-in hams are the most traditional and flavorful type of ham. This type of ham requires more time and energy to carve, as the bone must be removed first. Boneless hams are easier to carve, but the meat is not as flavorful, and the slices may be smaller.
Spiral-sliced hams are the easiest to carve but can be less flavorful than bone-in hams. The slices are pre-sliced in a spiral pattern, which makes for a more uniform look when served. This type of ham can be a time-saver for those who want to get their ham to the table faster.
When selecting the right type of ham for carving, consider the flavor, texture, and time required to carve. Choose a bone-in ham for the most flavor, a boneless ham for ease of carving, or a spiral-sliced ham for a time-saving option. With the right type of ham, carving will be a breeze.
Preparing the Ham
When it comes to carving a ham, the first step is to prepare the ham for carving. Start by ensuring that your ham is cooked to the appropriate internal temperature. To check this, insert an instant-read thermometer into the thickest part of the ham, away from any bone. The temperature should read 160°F before beginning to carve. Once the ham is cooked, carefully remove it from the oven and allow it to sit for 10-15 minutes before carving. This rest period will make it easier to carve the ham. During this time it’s a good idea to prepare the carving board and other utensils you will need for carving.
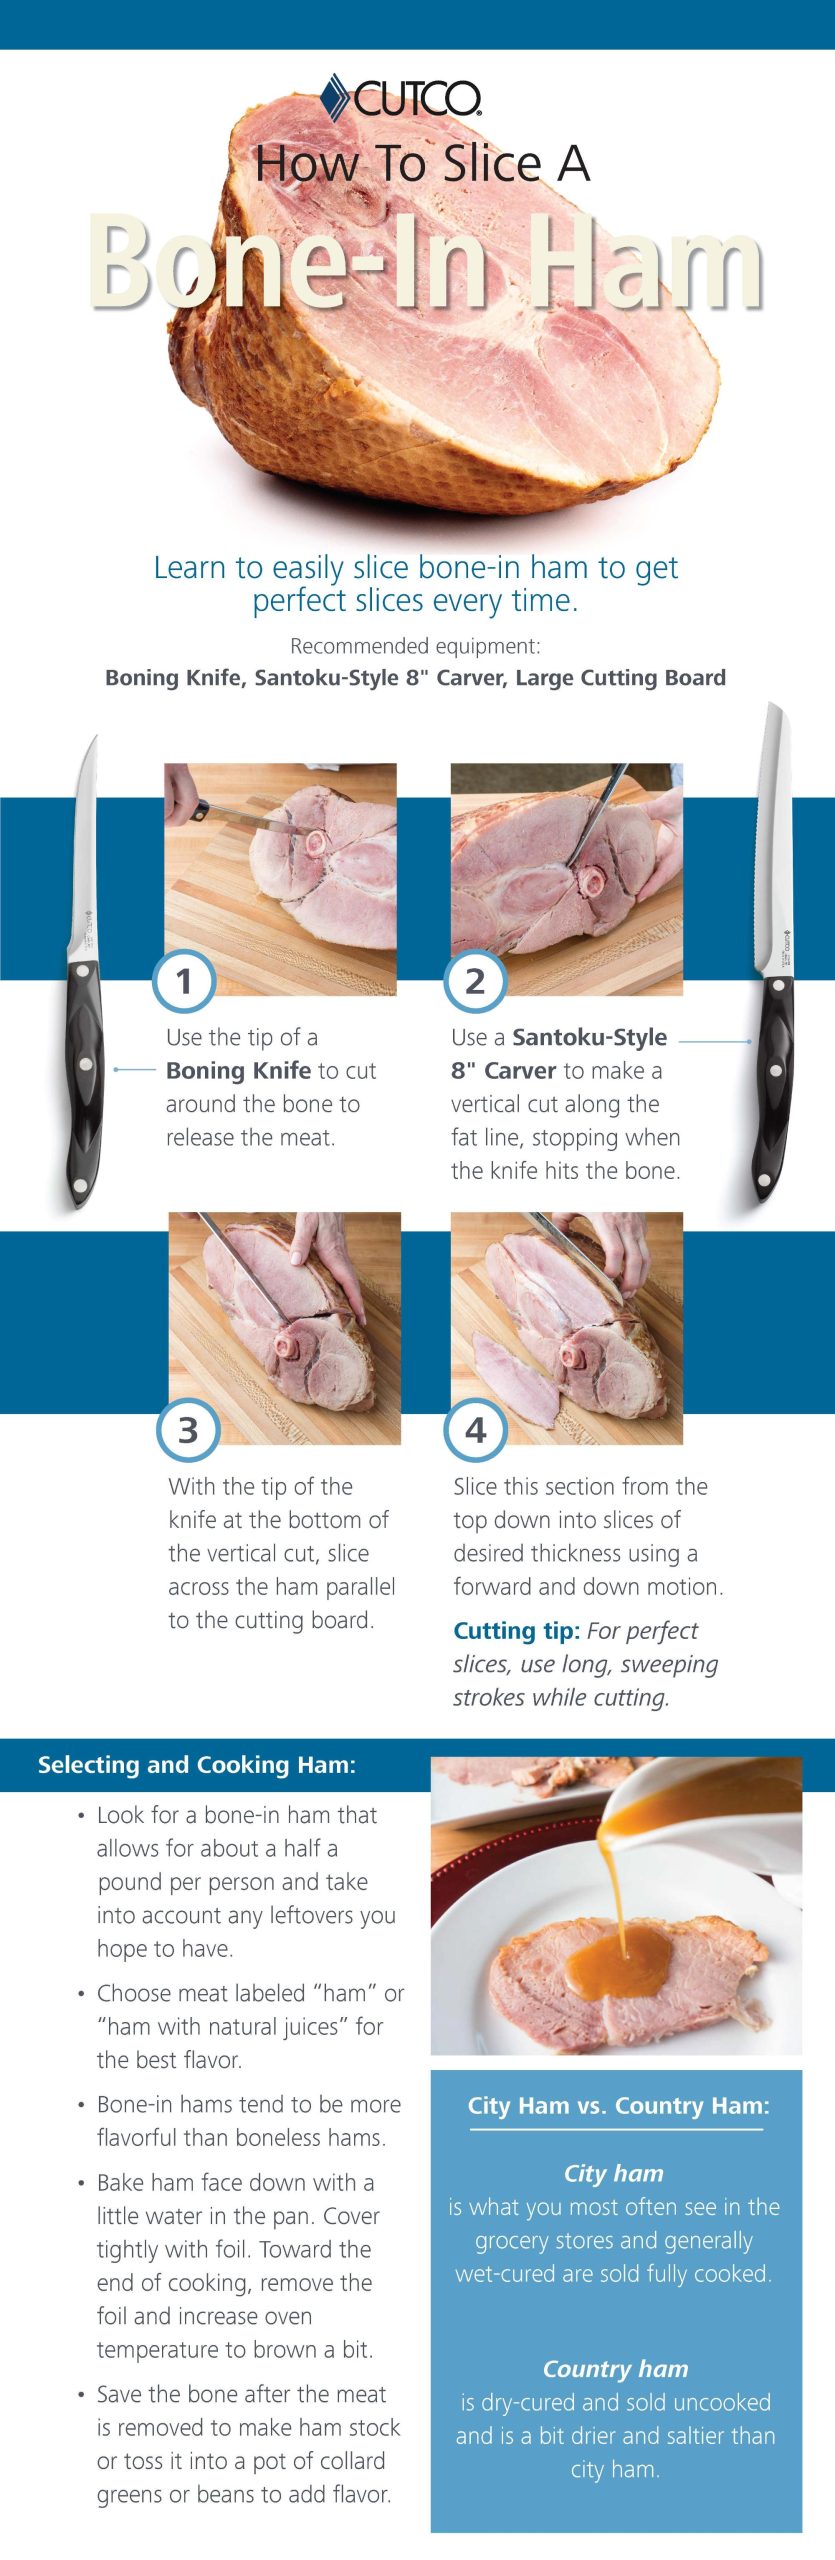
Carving the Ham
is one of the most important steps in the preparation of a delicious meal. It is essential to ensure that the meat is cooked correctly and that the carving is done in a way that maximizes taste and presentation.
Carving a ham can be a daunting task. After all, you want to ensure that you get the most out of your meal. But, with the right tools and techniques, it doesn’t have to be hard. To begin carving, select a sharp knife and cutting board. Make sure the board is large enough to provide a stable surface for making accurate slices. Start by cutting off the top layer of fat and then make wide, shallow slices across the ham. After this, you can start making thin slices, angling the knife slightly away from the bone. This will help ensure a clean, even cut.
When carving a ham, it is important to remember that presentation is key. Try to create uniform slices that are the same thickness. This will help to ensure that each piece of ham is cooked evenly and has the same flavor. As you carve, it can be helpful to place the slices in an orderly fashion on a plate. This will help create a visually appealing presentation.
When carving a ham, it is important to ensure that safety is a priority. Keep your hands away from the blade at all times and use caution when handling the meat. Finally, be sure to clean your knife and cutting board thoroughly after use to avoid cross-contamination.
Carving a ham can be a challenging task, but with the right tools and techniques it can be done quickly and easily. By following these steps, you can create a delicious meal that looks as good as it tastes.
:strip_icc()/BHG-How-to-Carve-a-Ham-Hero-01-3QkMFKGIKDMBZliy6WAj9d-09f6cc4f588446f6930031497e980deb.jpg)
Storing the Leftovers
Leftovers are a great way to enjoy a delicious meal again at a later date. But how do you store your ham so that it doesn’t spoil? Here are a few tips to help you properly store your leftovers and extend the life of your ham.
First, make sure to cool your ham as soon as possible. To do this, remove it from its packaging, place it on a plate, and put it in the refrigerator. This will help keep it fresh for up to four days. If you plan on storing it for longer, you can also freeze it. To freeze it, wrap the ham tightly in aluminum foil or freezer paper. This will help keep the ham from drying out and protect it from freezer burn.
When you’re ready to eat your leftover ham, make sure to thaw it in the refrigerator for best results. This will help keep the ham from spoiling and will also help to prevent it from drying out. You can then reheat it in the oven or microwave and enjoy a delicious meal that tastes just like it did when you first cooked it.
By following these simple tips, you can extend the life of your leftover ham and enjoy it for many days to come. So don’t let your ham go to waste, store it correctly and enjoy it again and again.
Serving Suggestions
If you’re wondering how to carve a ham, you’ll be pleased to know that it’s a relatively easy process. In fact, once you’ve mastered the basics, you’ll be able to craft a perfectly-portioned ham with ease. And, with a few simple serving suggestions, you can make your ham the star of the meal.
When it comes to carving a ham, the key is to start by cutting down the middle of the ham, separating the two halves. From there, you can begin to make thin, even slices along the surface of the ham. Be sure to use a sharp knife to minimize waste and ensure that each slice is properly cut.
When it comes to serving suggestions, there are plenty of ways to enjoy your perfectly-carved ham. For a traditional presentation, you can serve the slices with bread and a side of pickles or coleslaw. Or, for a more unique presentation, consider making a ham sandwich with lettuce, tomato, and your favorite condiment. You can also serve the ham slices with mashed potatoes, roasted vegetables, or macaroni and cheese.
No matter how you decide to serve your ham, you can be sure that your guests will be impressed. With the right technique and a few creative serving ideas, you can create a delicious ham dish that’s sure to be a hit.
Troubleshooting Common Carving Issues
Carving a ham can be a tricky task, especially if you’re unsure of the best techniques and tools for the job. But with the right knowledge and practice, you can easily become an expert carver. To help you troubleshoot common carving issues, here are a few tips to keep in mind. First, make sure you have the right tools for the job. A boning knife or cleaver will be your best bet for slicing and separating the ham. Also be sure to have a sharpening stone handy to keep your blade in top condition. Next, be sure to make your slices thin and even. This will ensure that your ham is cooked evenly and looks great when served. Finally, take your time as you carve. If you rush, you may end up with uneven or sloppy slices. With these tips in mind, you can be sure that your ham carving will be a success.
FAQs About the How Do I Carve My Ham?
1. What type of knife should I use for carving my ham?
A: You should use a sharp, thin-bladed knife for carving your ham.
2. Do I need to cook my ham before carving it?
A: Yes, you should always cook your ham before carving it.
3. How do I make sure I’m slicing my ham correctly?
A: Start by slicing your ham into thin, even slices, and then adjust the thickness as desired. Make sure you have a steady grip on the ham and the knife, and use a sawing motion when cutting.
Conclusion
Carving a ham is a great way to present a beautiful, flavorful, and moist dish. To carve a ham, you will need a sharp knife, a cutting board, and a large serving plate. Start by slicing the ham into thick slices and then cut the slices into smaller pieces. Be sure to cut away any excess fat and bone pieces before serving. Finally, arrange the slices on the serving plate for a delicious and visually appealing ham dish. With a few simple steps, you can enjoy a delectable ham meal that is sure to impress your family and friends.